Bodelin ProPrompter Wing & ProPrompter iPhone App Review

I create corporate technical education in my daytime job (screencasts and podcasts) and recently started getting into videocasts.

One of the things I struggled with was reading from a script for the audio podcasts and now that I’m doing video, it was even harder to scroll through a document while being on camera. This sent me searching for some of the the teleprompter solutions out there.

Through reading several video related blogs, I ended up coming across products from Bodelin Technologies. They made teleprompters, but for more higher end video production. Recently they created a lower end product for some of the video bloggers out there. The product they created was the ProPrompter Wing and a ProPrompter iPhone/iTouch App.

http://www.bodelin.com/proprompter/product_wing_mobile
http://apps.bodelin.com/

I recently purchased the products. The ProPrompter Wing was $129 with another $9.06 shipping fee for a total cost of $138.06. This pricing was not the $99 advertised in the many product reviews I read about. The ProPrompter iPhone/iTouch App was $9.99 ($10.80 with tax) from the iTunes store, again most product reviews said this was going to be free, but being in the software business, I understand there are costs involved even if delivery of goods is electronic.

Here are my thoughts on the hardware and software.

ProPrompter Wing hardware

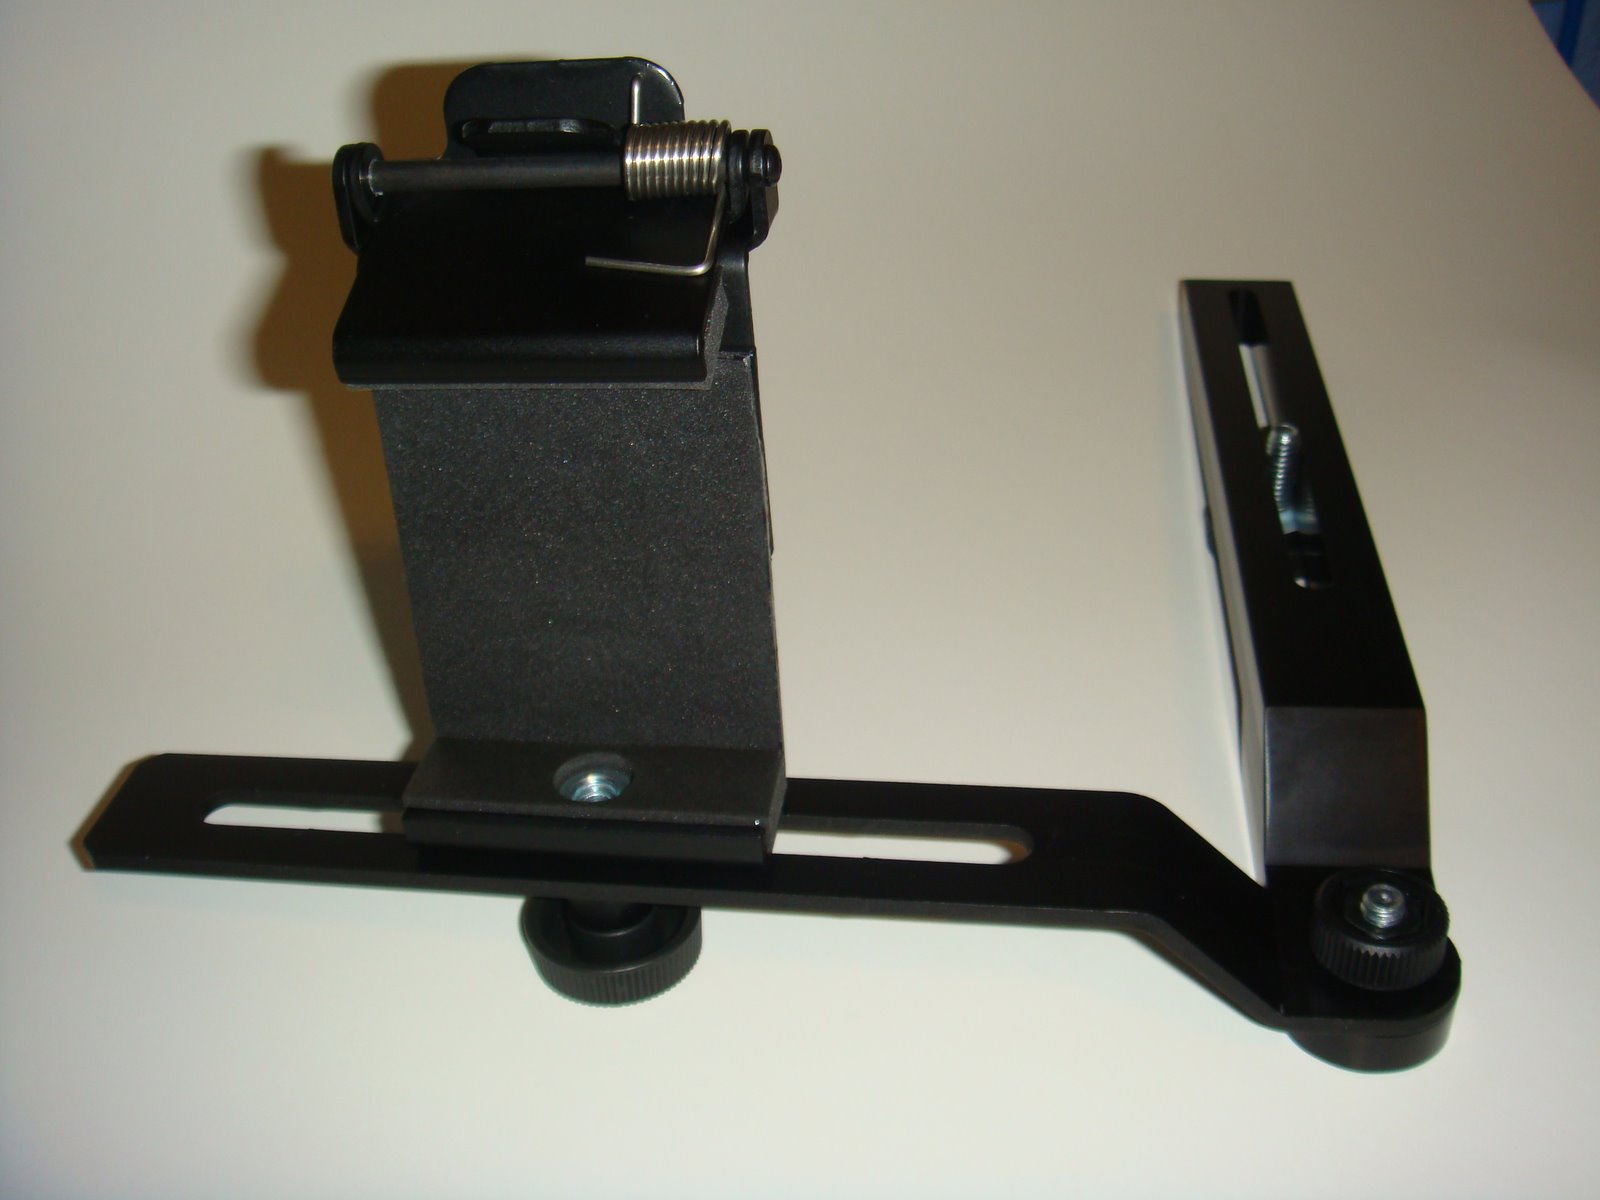
Here is a picture of the assembled ProPrompter Wing. The camera mount part is made from bar stock aluminum and it machined nicely with no rough edges at all, in fact if you strike the middle with your fingernail it will sound like a tuning fork. One of the things I noticed when I screwed the camera mount to the camera is the metal part of the thumbscrew marred the under surface of the camera mount. To fix this I created a small washer out of a plastic milk jug, you can see it on one of the thumbscrews below.

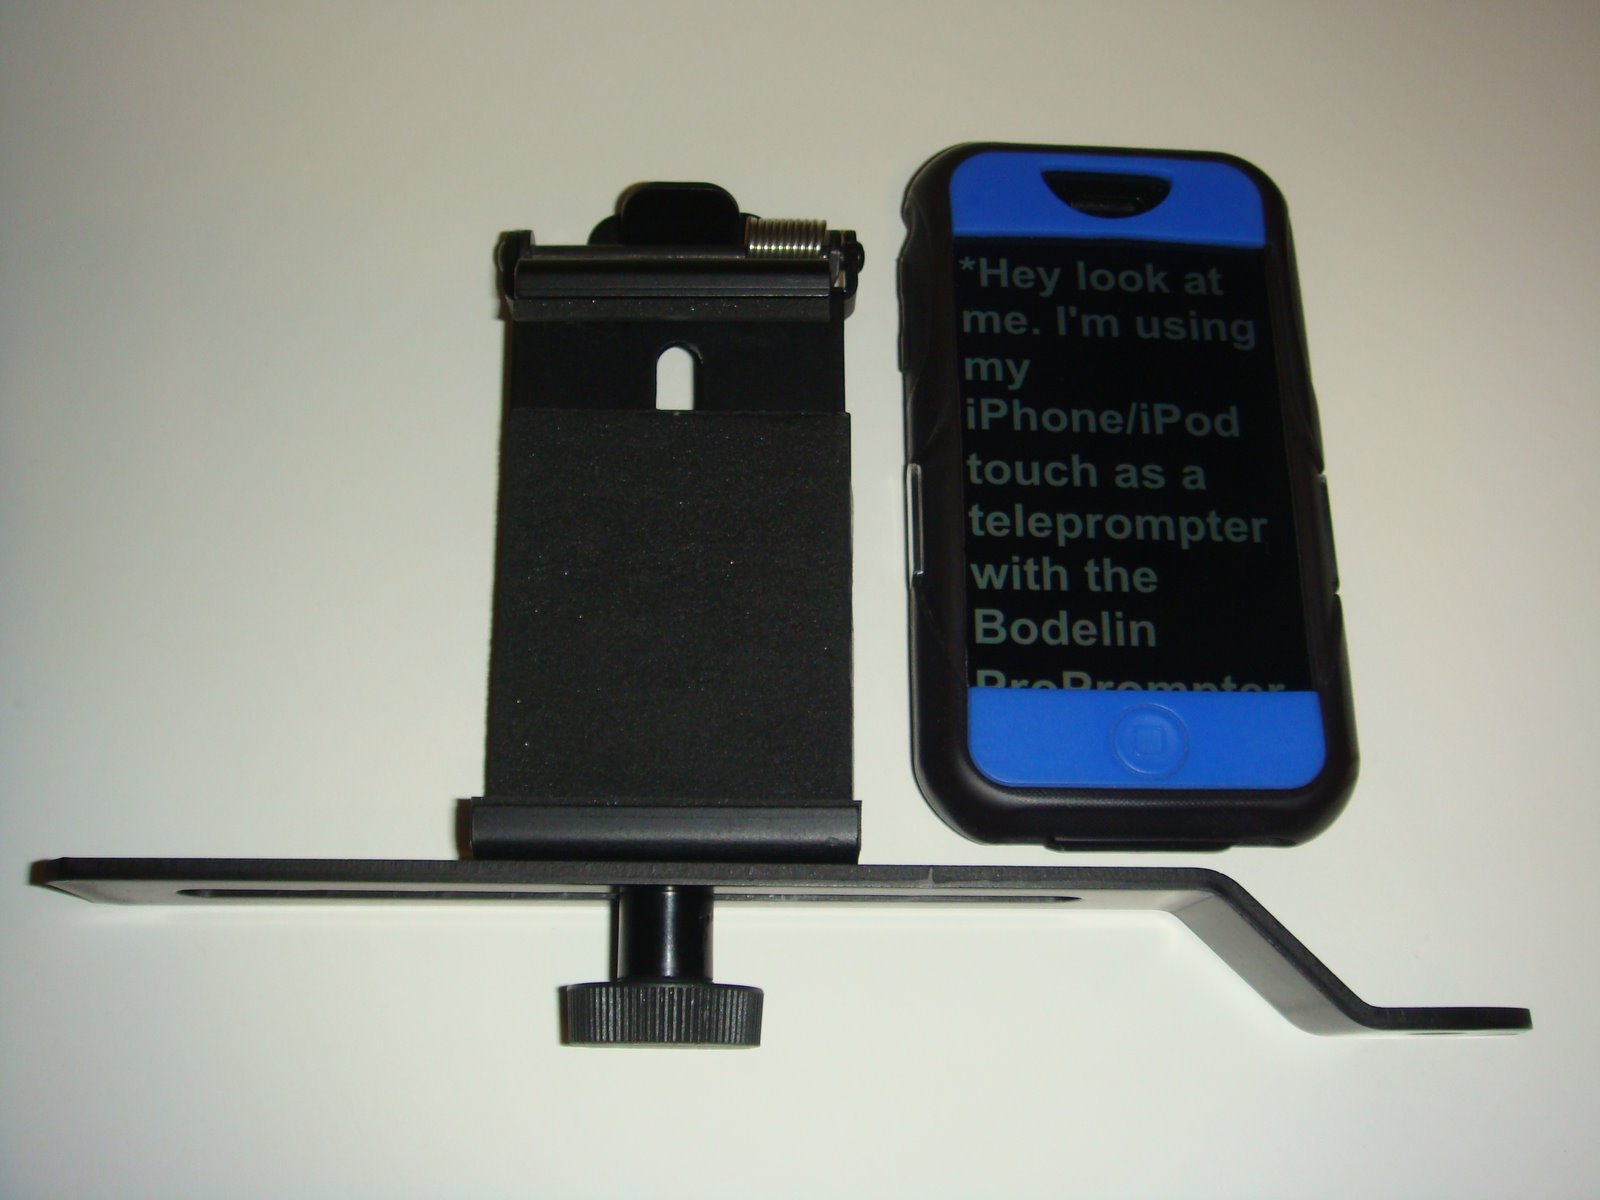
The mobile device clip base is made from stamped aluminum which is then bent to the shape you see. It would have been nice if Bodelin had put the same effort for this mobile device clip base as they did for the the camera mount, there are obvious stamp marks and rough edges, a big contrast in part quality. If you look at the larger version of the pictures notice the inner cutout has several points along the length and is not smooth.

This is what the mobile devide clip looks like with my iPhone.

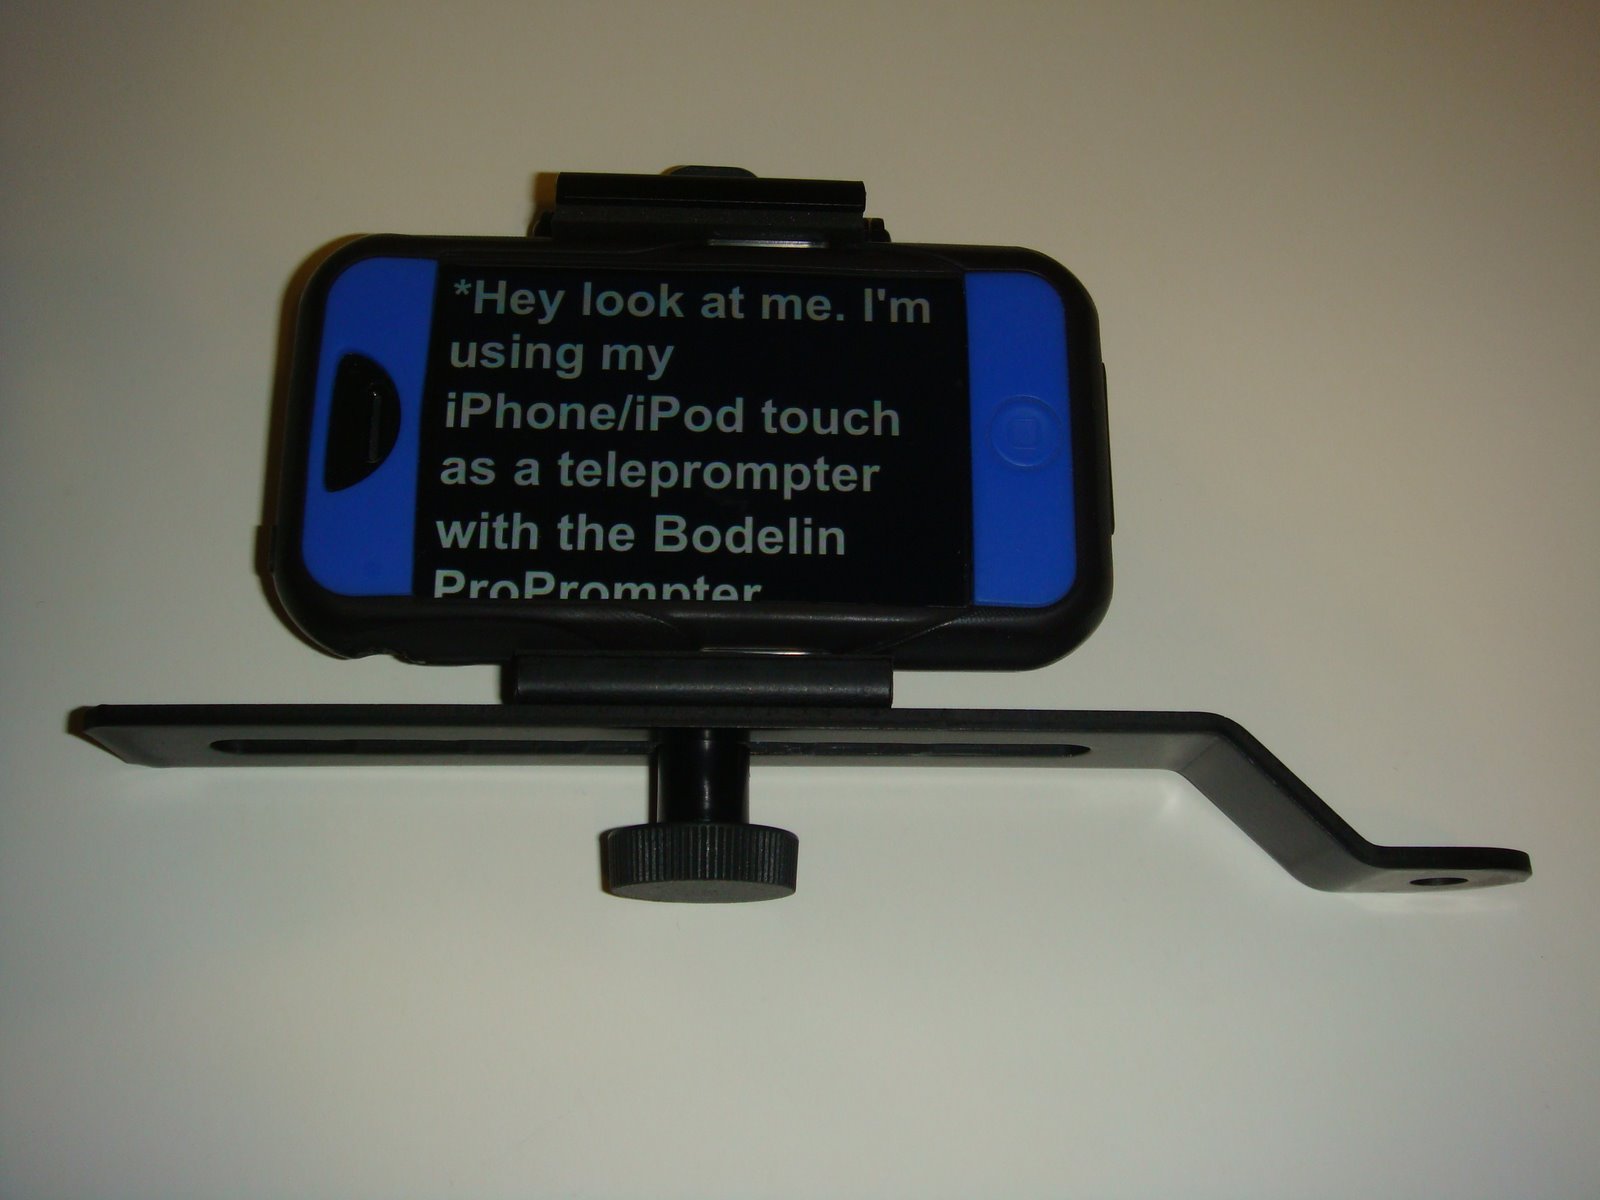
The ProPrompter App for the iPhone has a function to put the teleprompter in portrait mode, but unfortunately the mobile device clip, when fully extended, is not long enough to hold the iPhone in portrait mode (even without my iPhone rubber case). Maybe this is a design oversight on Bodelin’s part, who knows, maybe they will fix this in the future. The net here is that I cannot use the iPhone/iTouch software app in portait mode with the ProPrompter Wing.

Here is my setup.

One tip on recording video, since the teleprompter is next to the camera lens there is the chance that people will notice you not looking at them (the camera lens) while reading the script. In order to avoid this, move back away from the camera, maybe 8 to 10 feet. If you are not using a wireless mic or lapel mic, the audio may suffer. Using a wide angle lens will help with this, you can see the one I use on the camera above, as well as, my bluetooth wireless microphone also.

ProPrompter iPhone/iTouch App software

This software is easy to use on my iPhone, fairly straightforward, my biggest concern is how Bodelin designed the loading of teleprompter scripts into the app.

I cannot type my script into the app on the iPhone/iTouch directly.

I cannot take a text script file, add it to iTunes on my computer and sync it to load it in to the app.

I MUST use the Bodelin website EVERY TIME I want to load any text/script into the app. If I want to change my script, I need to do the upload/activate/download teleprompter dance with the Bodelin website.

Yes, even if I am in the field, I must have internet connectivity to load a script in the app!

So, without constant internet connectivity this software is unusable. With the iPhone this works most of the time since there is a data plan providing basic internet connectivity (unless you are in a area with no cell phone service at all, for me, there are some places I travel where this is the case). With the iTouch, it depends on your connectivity to a wi-fi network.

If the Bodelin website went down or is under maintenance, I cannot update my teleprompter scripts.

If this software does sell well, I sure hope Bodelin invested in webserver redundancy/loadleveling, backup, and scalability to ensure I can use this product when I need to (this means 24x7x365). Because if they did not, I will be stuck and unhappy, so will others. I’m sure there will be other teleprompter apps in the future to choose from (that don’t depend on a website to load scripts), that’s just how competition works.

From a corporate perspective I would be concerned about uploading scripts to the Bodelin website which may contain sensitive or even confidential corporate information. Because once I upload the text, I loose control over the information.

I hope you enjoyed this review.

Overall I like this product, it is functional, solid, and has practical use for me today and the future. Someday I hope to update to the ProPrompter ProMag for Mobile Devices (or something like it) to get the direct in front of lens teleprompting.

Take care & be safe.

– Dom

Whitfield Advantage Optima 3 Pellet Stove – Noisy/Rattling Blower

Ok, here’s a quick fix to a Whitfield Advantage Optima 3 noisy or rattling exhaust motor.

I found the rubber bushings that supported the full weight of the exhaust motor was not sufficient.  This resulted in vibration when the motor was running (it runs all the time since it’s a exhaust motor that vents combustion gases).

My In-Law’s Pellet Stove (I bought it for them):

All I did was brace the exhaust motor with some simple things you can find at a local hardware store.  The parts I used was a band clamp, galvanized strapping (used when building a house or patio), a metal screw, and a washer.  All the parts are metal since this motor gets quite hot.

Here are the pictures to show what I did (the exhaust motor is on the left side of the stove):

This is the exhaust motor with band clamp and galvanized support clamped on.


Just a close up to show some clearance between band clamp & motor wires, also see the motor support.


This photo shows how the galvanized strapping was bent to loop through the band clamp & create feet to screw to the bottom.


Sheet metal screw & washer to hold the base of the new motor support.


Hope this is useful to others.

– Dom

Fixing the scroll wheel on the Microsoft Arc Mouse

When I saw the Microsoft Arc Mouse in the retail store recently I just had to have it, the cool factor was high in my opinion. So I paid some $60 plus tax and took it home to play with.

After about one month of use the scroll wheel was intermittently working (it would click some of the time), then it stopped working (clicking) altogether in about 2 months.

When the wheel stopped working, I searched around the Internet and noticed many more people where having this exact same problem. Some had the mouse wheel stop within a couple weeks, and others in several days.

What follows is an account of how I fixed my mouse. I believe that this wheel problem is DESIGN related and here is what I did to fix it (for now).

*** START DISCLAIMER ***

If you are NOT TECHNICALLY INCLINED (or have the right tools) to fix your mouse please use the correct support procedures outlined by your retailer or Microsoft to get one that works or your money back for a different mouse. Following this procedure to fix your mouse will likely VOID the warranty!

*** END DISCLAIMER ***

Ok, now on with what I did … I could not take the mouse back to the retailer due to length of return time and I did not want to deal with MS support (more effort & energy than it’s worth) to get a replacement that will just break again.

Remove the skid pads on the front part of the mouse, they are held there with a bit of adhesive (like tape), I used a small screwdriver to pull up the edge of the skid pad then just pulled them off.  You can also use a small knife or hobby blade (think x-acto knife).  Keep them clean so you can reapply them later.  (Special thanks to sahil & Chuong for suggesting this part)

Once you remove the battery cover and batteries, there will be 3 screws under the label as shown in the pictures below. In addition, there are 4 screws under the black skid pads in the front part of the mouse.

The trick is removing the 3 screws under the label … the 2 side screws are of phillips type and the middle screw is different and requires a hex screwdriver. Not sure why MS decided to do this, but it makes taking apart the mouse harder since you need another tool.

After all screws are removed, the top cover will come off and you will see this:

The upper board just floats and is held down by the cover and wheel, to remove the wheel, just lift the upper board.

In my opinion, the problem with the mouse wheel lies in the material it is made of and the length of the hex shaped part of the shaft that fits into the mechanism that detects the wheel movement. My mouse wheel shaft was a little bit worn, but it was worn just enough and short enough to free spin and not turn the wheel mechanism.

I guess MS did not test the fact that people would be putting different pressures at different angles on this scroll wheel, hence the different failure rates with different people.

So what did I do to fix the problem?

I used some blue painter’s tape to provide a tighter fit and lengthen the end just slightly. This is a good enough fix to allow me to get more mileage out of the mouse and, as a side benefit, it gets rid of the loud plastic clicking sound the mouse made before.

To finish up … make sure the wheel spins freely, put the cover back on, put all the phillips screws back (not the hex one), replace the skid pads, add the batteries, and put the battery cover back on.

I hope this helps a lot of folks out there decide what to do with these cool yet dysfunctional mice!

Take care & be safe.

– Dom

*****

Additional Information on this post:

Matt wrote to me recently to tell me “I used superglue instead of tape, spin the tip around the part you taped and then once you have a thin but even coating around breathe (like a hot slow breath, not like blowing out candles) to help the glue set (super glue sets with water, the moisture in your breath will help speed things up). After a minute it should be dry and then just put the scroll wheel back in and its as good as new :)”. Thanks Matt.

HVAC "service professional" experience

Ok, here is my account of a recent bad experience with a local HVAC / Climate Control company and how I did some additional research and troubleshooting to replace a White-Rodgers control board on the York Diamond 80 Furnace/AC unit in my house to save about $300.

*** START DISCLAIMER ***

Of course, it goes without saying for things of this nature … if you are NOT TECHNICALLY INCLINED/COMPETENT (or have the right tools) to do this yourself, please employ a professional since the risks are high to you personally and/or your home.

*** END DISCLAIMER ***

The initial problem started when we tried to start the heater for the first time this season. The furnace was not blowing hot air to heat the house. It was blowing cold air.

Here it the HVAC unit in my house:

I checked the control board and it was flashing some lights indicating something was wrong (error codes). The LED is on the lower left of this picture in red.

The flashing code sheet on the control unit indicated the pressure switch was stuck closed.

Here is the upper (heat) portion of the HVAC system:

The pressure vacuum switch is just by the exhaust blower motor, and it connected to it by a clear vacuum hose (upper part of the picture). I checked the switch with a meter (continuity test) and put some vacuum on it and it open and closed properly, so this was not the problem.

Since this all happened on the weekend (Saturday) and I was leaving town on Tuesday and it was starting to get cold here, I called a local HVAC company to fix this for me. I did not want my wife and kids dealing with a cold house (and a service person) while I was out of town for the rest of the week.

I found one of the HVAC service companies working on the weekend, so I asked for a service technician to come over to fix the unit.

The guy arrived and started to check things out, I watched intently so I could learn something since this was running me about $80 just for the visit.

He saw the same flashing error code, then checked the switch, then checked the voltage going to the exhaust blower. Went through several startup sequences. After all that he said the problem is likely a bad control board or a bad exhaust blower.

I asked if there was a test he could perform to just test the exhaust blower to rule it out as a problem. He said it was highly unlikely that the exhaust blower was bad, more likely the control board. I found it quite frustrating that I was paying him to diagnose the exact problem only to get this answer. All I was looking for was a simple test to make sure the exhaust blower was working.

He got on his portable laptop to lookup the replacement control board for this unit to fix it, and he was unable to find the exact replacement. He said the company can call on Monday for a quote to fix it. He swiped my credit card, charged $80 for the visit and left.

He really did not help my situation, but I learned something from the visit. As much as you think these folks know what they are doing, they still fail to satify the customer/me (by ruling out the exhaust blower as the problem).

He also missed a significant problem. I found the large blower (main air mover to the house) had charring on the capacitor terminals with some melted leads (due to someone cinching down the cable tie too much at some point in the past). Since the blower was working, I assumed the capacitor was still good, so I cleaned up the connections and replaced the terminators as shown below.

Still without heat, I went to work testing the exhaust blower. Since it was a 60 Hz 110 AC motor, I found a old small appliance plug, cut it, striped the leads, and connected it to the motor connectors to briefly see if the motor would turn (I would like to point out that I know about testing this safely and want to point to the disclaimer for your situation). After some work, the motor turned and that was not the problem. I went online to see about finding a control board.

The control board I had was a White-Rodgers 50A50-241, I went to www.white-rodgers.com to find more info about this board. It was an old board, and it was replaced by a 50A55-843 control board. Searching around, I found it as much as $100 and as high as $250 on the internet. Since I needed this board fairly quickly, I called some local service & repair places to find it locally. Not many of these people are open on the weekend, so I had to wait until Monday.

Monday morning, the HVAC company called, it would cost $500+ to fix the unit, and it would require a “part acquisition fee” since the part was in a nearby large city (is this a new way of getting more $ out of you?). This did not work for me since I was leaving town the next day. The internet did not work also, since the part would take a day minimum to get here.

Meanwhile, I did find the control board at local plumbing/heating/cooling retailer, it was $200. I drove to the retailer to pickup the board and went home to install it before leaving town the next day.

I can say, the newer control board has plenty of information on the website, such as a troubleshooting document that would have been very helpful with the older one I was having trouble with.

I took pictures of all the connections of the old board, labeled all the connections also. Then drilled two new holes to mount the new control board since it was smaller than the old one (used 2 of the old holes to mount the new board).

All the connections were the same if not very similar, so pretty easy to replace a old board with a new one. Here is what it looked like after installing it (remember to disconnect the power before doing anything electrical).

Thinking back to this summer, there was a lightning strike very near to the house that took out a printer (connected to the phone line) & a cordless phone. Maybe it had something to do with the heater part of the control board, who knows?

All in all, I managed to provide my family with heat at a cost less than a “service professional”. I was rather fortunate that a local retailer had the control board for a reasonable price under the time constraints I had.

I hope this post helps some folks out there with my experience.

Take care & be safe.

– Dom